Building Graphical User Interfaces (GUIs)
Using the Microsoft Foundation Classes (MFC)
All of these examples assume that Microsoft Visual C++ 2010 or 2012 is the compiler being used.
Link to Sketcher Part 3
Exercise 5: Sketcher (Part 2) - a drawing program
Building Sketcher
Expanding the Menus
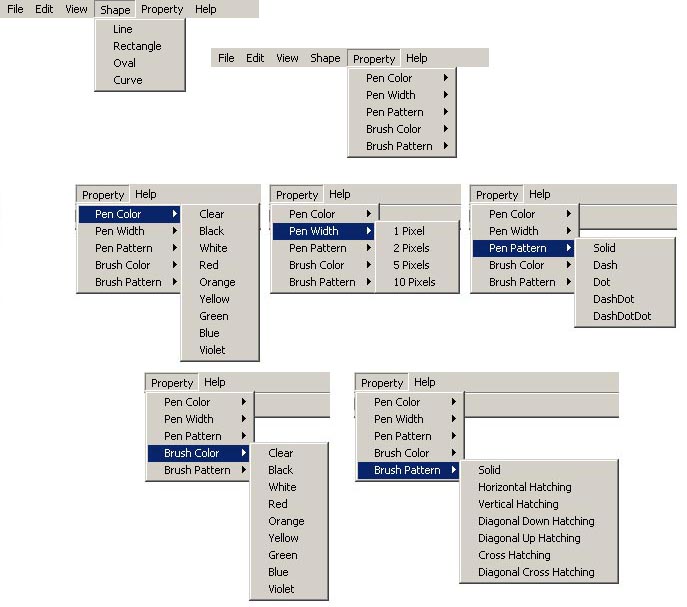
Open the menu resource of your Sketcher project. Do not create a new menu resource. Use
the default menu that VS created for you. Add menus, menu items, and sub-menus
to match the following images. Remember you can click-and-drag a menu or a menu item to reposition
it in its' containing menubar or menu.
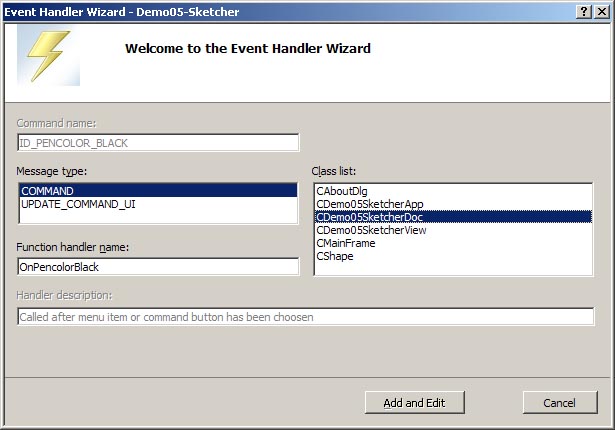
Add Event Handlers
Right click each of the items in the Shape menu and each of the items in the sub-menus
of the Property menu and select the Add Event Handler... option. When the
dialog box shown below appears select the projectNameDoc.cpp file as the
location for the event handler function, then click the Add and Edit button.
Do this for all the menu options then you will add the code to handle each of these.
Define a Constants.h file
In order to make this code more self commenting you should also #define some constant terms
and create some color objects.
-
Right click the Header Files folder in your Sketcher project.
-
Select Add->New Item...
-
In the dialog box that appears select Code from the list on the left,
and Header File (.h) from the list on the right.
-
Enter the name for the header file as Constants.h
-
Click the Add button.
-
Open the Constants.h file and copy and paste the code below into it.
//======================================================================
// Constants.h
// Defines all the constants for shape type, and drawing color
//======================================================================
#pragma once		// Only define these once

// Defines for shapes
#define LINE         1
#define RECTANGLE    2
#define OVAL         3
#define CURVE        4

// Define for a solid brush pattern with no hatching (default)
#define BRUSH_PATTERN_SOLID		32767

// COLORREF objects for colors
const COLORREF	COLOR_CLEAR   = RGB(1, 1, 1); // Won't actually use this
const COLORREF	COLOR_BLACK   = RGB(0, 0, 0);
const COLORREF	COLOR_WHITE   = RGB(255, 255, 255);
const COLORREF	COLOR_RED     = RGB(255, 0, 0);
const COLORREF	COLOR_ORANGE  = RGB(255, 128, 0);
const COLORREF	COLOR_YELLOW  = RGB(255, 255, 0);
const COLORREF	COLOR_GREEN   = RGB(0, 255, 0);
const COLORREF	COLOR_BLUE    = RGB(0, 0, 255);
const COLORREF	COLOR_VIOLET  = RGB(128, 0, 255);
Add Variables
Define some variables to hold the currently selected pen color, pen style,
pen width, brush color and brush style.
Add the following code defining these variables at the end of the
class definition in projectNameDoc.h (just before the closing
}; of the class definition).
private:
	int m_iCurShape;
	COLORREF m_CurPenColor;
	int m_iCurPenWidth;
	int m_iCurPenPattern;
	COLORREF m_CurBrushColor;
	int m_iCurBrushPattern;
Initialize the Variables
Next go to the constructor function in projectNameDoc.cpp and
set an initial value for each of these variables with the code shown below.
//----------------------------------------------
// Default constructor for CDemo05SketcherDoc
//----------------------------------------------
CDemo05SketcherDoc::CDemo05SketcherDoc()
{
     // TODO: add one-time construction code here
	m_iCurShape = LINE;
	m_CurPenColor = COLOR_BLACK;
	m_iCurPenWidth = 1;
	m_iCurPenPattern = PS_SOLID;
	m_CurBrushColor = COLOR_WHITE;
	m_iCurBrushPattern = BRUSH_PATTERN_SOLID;
}
Add get functions for each variable
You will need to add public get functions for each of the variables. Add these
to the class by adding the following to the projectNameDoc.h file.
public:
	int getCurrentShape();
	COLORREF getCurrentPenColor();
	int getCurrentPenWidth();
	int getCurrentPenPattern();
	COLORREF getCurrentBrushColor();
	int getCurrentBrushPattern();
Now add the following code to the projectNameDoc.cpp file to
implement these functions.
DO NOT COPY AND PASTE THIS CODE INTO YOUR APPLICATION.
THE CLASS NAME USED BELOW WILL NOT MATCH YOUR CLASS NAME.
//---------------------------------------------------
// Get the current shape
//---------------------------------------------------
int CDemo05SketcherDoc::getCurrentShape()
{
	return m_iCurShape;
}

//---------------------------------------------------
// Get the current pen color
//---------------------------------------------------
COLORREF CDemo05SketcherDoc::getCurrentPenColor()
{
	return m_CurPenColor;
}

//---------------------------------------------------
// Get the current pen width
//---------------------------------------------------
int CDemo05SketcherDoc::getCurrentPenWidth()
{
	return m_iCurPenWidth;
}

//---------------------------------------------------
// Get the current pen pattern
//---------------------------------------------------
int CDemo05SketcherDoc::getCurrentPenPattern()
{
	return m_iCurPenPattern;
}

//---------------------------------------------------
// Get the current brush color
//---------------------------------------------------
COLORREF CDemo05SketcherDoc::getCurrentBrushColor()
{
	return m_CurBrushColor;
}

//---------------------------------------------------
// Get the current brush pattern
//---------------------------------------------------
int CDemo05SketcherDoc::getCurrentBrushPattern()
{
	return m_iCurBrushPattern;
}
Add Event Handler Code
Finally, add the code to each of the menu item event handler functions in projectNameDoc.cpp.
The code below shows all of those functions from the demonstration program shown in class.
DO NOT COPY AND PASTE THIS CODE INTO YOUR APPLICATION.
THE CLASS NAME USED BELOW WILL NOT MATCH YOUR CLASS NAME.
The predefined patterns for pens and brushes is on the previous page of this tutorial, but they are
repeated here for reference:
Pen Styles
-
PS_SOLID
-
PS_DASH
-
PS_DOT
-
PS_DASHDOT
-
PS_DASHDOTDOT
-
PS_NULL
-
PS_INSIDEFRAME (like solid but points specified are on the edge of the pen width
instead of in the center)
|
Brush Styles
-
HS_HORIZONTAL
-
HS_VERTICAL
-
HS_BDIAGONAL
-
HS_FDIAGONAL
-
HS_CROSS
-
HS_DIAGCROSS
-
HS_NULL
-
PS_INSIDEFRAME (like solid but points specified are on the edge of the pen width
instead of in the center)
|
//-------------------------------------------------------
// Set the shape to draw to LINE
//-------------------------------------------------------
void CDemo05SketcherDoc::OnShapeLine()
{
	m_iCurShape = LINE;
}

//-------------------------------------------------------
// Set the shape to draw to RECTANGLE
//-------------------------------------------------------
void CDemo05SketcherDoc::OnShapeRectangle()
{
	m_iCurShape = RECTANGLE;
}

//-------------------------------------------------------
// Set the shape to draw to OVAL
//-------------------------------------------------------
void CDemo05SketcherDoc::OnShapeOval()
{
	m_iCurShape = OVAL;
}

//-------------------------------------------------------
// Set the shape to draw to CURVE
//-------------------------------------------------------
void CDemo05SketcherDoc::OnShapeCurve()
{
	m_iCurShape = CURVE;
}

//-------------------------------------------------------
// Set the pen color to COLOR_CLEAR. In this case we will
//  create a pen with style = PS_NULL
//-------------------------------------------------------
void CDemo05SketcherDoc::OnPencolorClear()
{
	m_CurPenColor = COLOR_CLEAR;
}

//-------------------------------------------------------
// Set the pen color to COLOR_BLACK
//-------------------------------------------------------
void CDemo05SketcherDoc::OnPencolorBlack()
{
	m_CurPenColor = COLOR_BLACK;
}

//-------------------------------------------------------
// Set the pen color to COLOR_WHITE
//-------------------------------------------------------
void CDemo05SketcherDoc::OnPencolorWhite()
{
	m_CurPenColor = COLOR_WHITE;
}

//-------------------------------------------------------
// Set the pen color to COLOR_RED
//-------------------------------------------------------
void CDemo05SketcherDoc::OnPencolorRed()
{
	m_CurPenColor = COLOR_RED;
}

//-------------------------------------------------------
// Set the pen color to COLOR_ORANGE
//-------------------------------------------------------
void CDemo05SketcherDoc::OnPencolorOrange()
{
	m_CurPenColor = COLOR_ORANGE;
}

//-------------------------------------------------------
// Set the pen color to COLOR_YELLOW
//-------------------------------------------------------
void CDemo05SketcherDoc::OnPencolorYellow()
{
	m_CurPenColor = COLOR_YELLOW;
}

//-------------------------------------------------------
// Set the pen color to COLOR_GREEN
//-------------------------------------------------------
void CDemo05SketcherDoc::OnPencolorGreen()
{
	m_CurPenColor = COLOR_GREEN;
}

//-------------------------------------------------------
// Set the pen color to COLOR_BLUE
//-------------------------------------------------------
void CDemo05SketcherDoc::OnPencolorBlue()
{
	m_CurPenColor = COLOR_BLUE;
}

//-------------------------------------------------------
// Set the pen color to COLOR_VIOLET
//-------------------------------------------------------
void CDemo05SketcherDoc::OnPencolorViolet()
{
	m_CurPenColor = COLOR_VIOLET;
}

//-------------------------------------------------------
// Set the pen width to 1 pixel
//-------------------------------------------------------
void CDemo05SketcherDoc::OnPenwidth1pixel()
{
	m_iCurPenWidth = 1;
}

//-------------------------------------------------------
// Set the pen width to 2 pixels
//-------------------------------------------------------
void CDemo05SketcherDoc::OnPenwidth2pixels()
{
	m_iCurPenWidth = 2;
}

//-------------------------------------------------------
// Set the pen width to 5 pixels
//-------------------------------------------------------
void CDemo05SketcherDoc::OnPenwidth5pixels()
{
	m_iCurPenWidth = 5;
}

//-------------------------------------------------------
// Set the pen width to 10 pixels
//-------------------------------------------------------
void CDemo05SketcherDoc::OnPenwidth10pixels()
{
	m_iCurPenWidth = 10;
}

//-------------------------------------------------------
// Set the pen pattern to PS_SOLID
//-------------------------------------------------------
void CDemo05SketcherDoc::OnPenpatternSolid()
{
	m_iCurPenPattern = PS_SOLID;
}

//-------------------------------------------------------
// Set the pen pattern to PS_DASH
//-------------------------------------------------------
void CDemo05SketcherDoc::OnPenpatternDash()
{
	m_iCurPenPattern = PS_DASH;
}

//-------------------------------------------------------
// Set the pen pattern to PS_DOT
//-------------------------------------------------------
void CDemo05SketcherDoc::OnPenpatternDot()
{
	m_iCurPenPattern = PS_DOT;
}

//-------------------------------------------------------
// Set the pen pattern to PS_DASHDOT
//-------------------------------------------------------
void CDemo05SketcherDoc::OnPenpatternDashDot()
{
	m_iCurPenPattern = PS_DASHDOT;
}

//-------------------------------------------------------
// Set the pen pattern to PS_DASHDOTDOT
//-------------------------------------------------------
void CDemo05SketcherDoc::OnPenpatternDashdotdot()
{
	m_iCurPenPattern = PS_DASHDOTDOT;
}

//-------------------------------------------------------
// Set the brush color to COLOR_CLEAR.  In this case we
//  will just use the stock brush NULL_BRUSH.
//-------------------------------------------------------
void CDemo05SketcherDoc::OnBrushcolorClear()
{
	m_CurBrushColor = COLOR_CLEAR;
}

//-------------------------------------------------------
// Set the brush color to COLOR_BLACK
//-------------------------------------------------------
void CDemo05SketcherDoc::OnBrushcolorBlack()
{
	m_CurBrushColor = COLOR_BLACK;
}

//-------------------------------------------------------
// Set the brush color to COLOR_WHITE
//-------------------------------------------------------
void CDemo05SketcherDoc::OnBrushcolorWhite()
{
	m_CurBrushColor = COLOR_WHITE;
}

//-------------------------------------------------------
// Set the brush color to COLOR_RED
//-------------------------------------------------------
void CDemo05SketcherDoc::OnBrushcolorRed()
{
	m_CurBrushColor = COLOR_RED;
}

//-------------------------------------------------------
// Set the brush color to COLOR_ORANGE
//-------------------------------------------------------
void CDemo05SketcherDoc::OnBrushcolorOrange()
{
	m_CurBrushColor = COLOR_ORANGE;
}

//-------------------------------------------------------
// Set the brush color to COLOR_YELLOW
//-------------------------------------------------------
void CDemo05SketcherDoc::OnBrushcolorYellow()
{
	m_CurBrushColor = COLOR_YELLOW;
}

//-------------------------------------------------------
// Set the brush color to COLOR_GREEN
//-------------------------------------------------------
void CDemo05SketcherDoc::OnBrushcolorGreen()
{
	m_CurBrushColor = COLOR_GREEN;
}

//-------------------------------------------------------
// Set the brush color to COLOR_BLUE
//-------------------------------------------------------
void CDemo05SketcherDoc::OnBrushcolorBlue()
{
	m_CurBrushColor = COLOR_BLUE;
}

//-------------------------------------------------------
// Set the brush color to COLOR_VIOLET
//-------------------------------------------------------
void CDemo05SketcherDoc::OnBrushcolorViolet()
{
	m_CurBrushColor = COLOR_VIOLET;
}

//-------------------------------------------------------
// Set the brush pattern to BRUSH_PATTERN_SOLID
//-------------------------------------------------------
void CDemo05SketcherDoc::OnBrushpatternSolid()
{
	m_iCurBrushPattern = BRUSH_PATTERN_SOLID;
}

//-------------------------------------------------------
// Set the brush pattern to HS_HORIZONTAL
//-------------------------------------------------------
void CDemo05SketcherDoc::OnBrushpatternHorizontalhatching()
{
	m_iCurBrushPattern = HS_HORIZONTAL;
}

//-------------------------------------------------------
// Set the brush pattern to HS_VERTICAL
//-------------------------------------------------------
void CDemo05SketcherDoc::OnBrushpatternVerticalhatching()
{
	m_iCurBrushPattern = HS_VERTICAL;
}

//-------------------------------------------------------
// Set the brush pattern to HS_BDIAGONAL
//-------------------------------------------------------
void CDemo05SketcherDoc::OnBrushpatternDiagonaldownhatching()
{
	m_iCurBrushPattern = HS_BDIAGONAL;
}

//-------------------------------------------------------
// Set the brush pattern to HS_FDIAGONAL
//-------------------------------------------------------
void CDemo05SketcherDoc::OnBrushpatternDiagonaluphatching()
{
	m_iCurBrushPattern = HS_FDIAGONAL;
}

//-------------------------------------------------------
// Set the brush pattern to HS_CROSS
//-------------------------------------------------------
void CDemo05SketcherDoc::OnBrushpatternCrosshatching()
{
	m_iCurBrushPattern = HS_CROSS;
}

//-------------------------------------------------------
// Set the brush pattern to HS_DIAGCROSS
//-------------------------------------------------------
void CDemo05SketcherDoc::OnBrushpatternDiagonalcrosshatching()
{
	m_iCurBrushPattern = HS_DIAGCROSS;
}
Adding User Interface Handlers
We now have all of the menu items and handlers for each when that item is chosen. But, how can
we let the user know what the currently selected shape, pen color, brush color, etc. is? It would
be very convenient if we could put a check mark in front of the currently selected item in each of
the menus. And there is a relatively simple technique for doing that.
There is a different type of event handler function that can be created for each menu item. It is
known as an UPDATE_COMMAND_UI function. The UI stands for User
Interface. (BTW: the event handler functions you have already added are known simply
as COMMAND functions.) When you first click on a menu, before the menu is displayed an
UPDATE_COMMAND_UI message is sent for each item in the menu. This lets you set whatever is needed
before the user sees the menu.
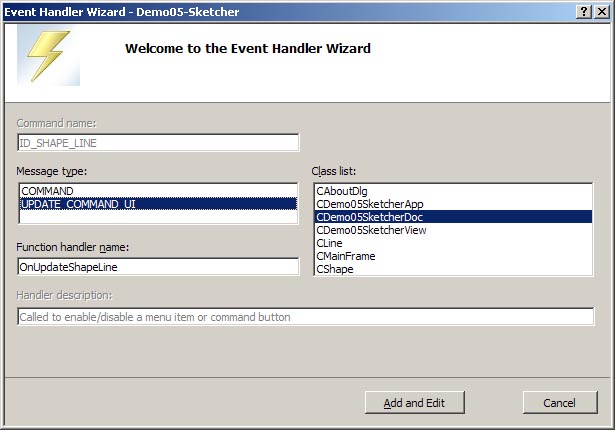
Follow the steps below to add UPDATE_COMMAND_UI functions for each
of the menu items for which you already have COMMAND functions.
First open the menu resource in the resource editor. Then for each selectable menu item in the Shape
menu and the Pen Color, Pen Width, Pen Pattern, Brush Color, and Brush Pattern sub-menus do the following:
-
Right click the menu item and select Add Event Handler...
-
In the dialog box that appears select the projectNameDoc class in the
Class list: list box and select UPDATE_COMMAND_UI from the
Message type: list box as shown in the image below.
-
Click the Add and Edit button. This will take you to the code in
projectNameDoc where the function was added.
Next, we'll add the required code, but first look at the argument passed into each of the update
functions. It is a pointer to a CCmdUI object. This is a MFC class object that is used
only for menu items and toolbar items. It points to the item that originated the message so it
can be used to update that item. There are five functions which can be called using this pointer:
-
ContinueRouting() - Just passes the message on to the next priority handler.
-
Enable() - Enables or disables the item based on the value of the single
boolean argument.
-
SetCheck() - Sets a check mark for the item based on the value of the single
boolean argument.
-
SetRadio() - Sets a radio button item on or off based on the value of the single
boolean argument.
-
SetText() - Sets the text for the item based on the single string argument.
We want to use the SetCheck() function. Below is the code for the UPDATE_COMMAND_UI function
for the Line menu item.
	//-------------------------------------------------------
	// Set the check status for the "Line" menu option
	//-------------------------------------------------------
	void CDemo05SketcherDoc::OnUpdateShapeLine(CCmdUI *pCmdUI)
	{
		pCmdUI->SetCheck(m_iCurShape == LINE);
	}
Note that based on whether m_iCurShape (the variable defined in projectNameDoc
that stores the indicator for which shape to draw) is or is not set to LINE the appropriate boolean value
will be sent to SetCheck() to either place or remove a check mark from in front of the
Line menu item in the Shape menu. You will now need to add the appropriate code for
each of your "Update" functions. Do this then try selecting different items in the menus
and see if the check marks appear at the correct locations. BTW: You may begin to notice that
a good deal of the work in building GUI applications is boring and repetitious. But, now we
have finished most of the boring stuff so when you have finished adding all of the menu item
handlers continue with the next section.
Link to Sketcher Part 3