-
How do I add a variable to a widget
in a dialog box that can be used to access that widget in my code?
-
How do I add an event handler to a widget
in a dialog box?
-
How do I handle clicks on the OK or Cancel button
in a dialog box?
-
How do I create and use a button
in a dialog box?
-
How do I create and use a check box
in a dialog box?
-
How do I create and use radio buttons
in a dialog box?
-
How do I create and use a text box (Edit Control)
in a dialog box?
-
How do I create and use a list box
in a dialog box?
-
How do I create and use a combo box
in a dialog box?
-
How do I set the font in a Static Text widget?
-
How do I import a bitmap resource?
In the dialog resource editor right click the widget you want to add a variable to and select
Add Variable from the popup menu. A dialog box will appear in which you can enter the
variable name. Click OK and the variable will be added to your ProgramNameDlg.cpp file.
In the dialog resource editor right click the widget you want to add an event handler to and select
Add Event Handler from the popup menu. A dialog box will appear in which you can specify
the message type (example: BN_CLICKED for a button), the Class to contain the function (usually
your ProgramNameDlg.cpp file), and the handler name (example: OnBnClickedButton1).
You will usually want to use the default message type and class but you may want to give the
function a more meaningful name, like OnBnClickedRunSimButton instead of the more
cryptic default name of OnBnClickedButton1
In the dialog resource editor right click the OK or the Cancel buttons and select
Add Event Handler from the popup menu. A function like the ones below will be created
in your ProgramNameDlg.cpp file. Add your code to handle clicks on either
of these buttons just before the call to the OnOK or OnCancel function. Note:
in the initInstance function found in the ProgramName.cpp file there is a
place where you will see comments like: "// Place code here to handle when the dialog is dismissed with OK/Cancel".
Unfortunately at this point you will no longer be able access any of the dialog
box widgets. If you need to do something like read text from an edit control after the
OK or the Cancel buttons have been clicked you must do it in one of these functions.
Note: if you dismiss the
dialog box by clicking the X button on the right in the title bar it is the same
as if you clicked the Cancel button.
void CWidgetsTestDlg::OnBnClickedOk()
{
	// TODO: Add your control notification handler code here
	OnOK();
}

void CWidgetsTestDlg::OnBnClickedCancel()
{
	// TODO: Add your control notification handler code here
	OnCancel();
}
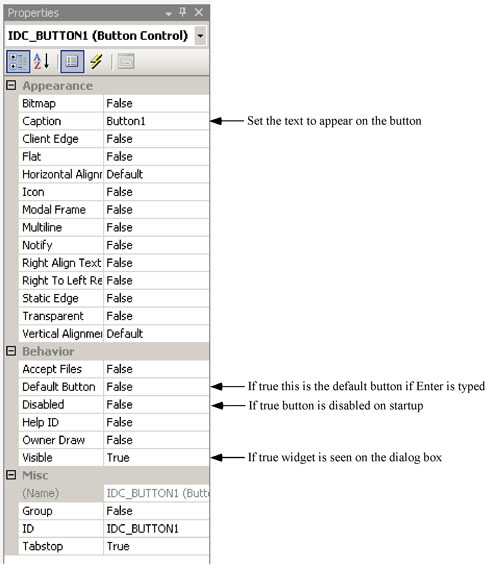
In the dialog resource click the Toolbox
tab and select Button from the list. Use the mouse to click and drag the size
and location of the button. With the new text box selected you will see the properties listed.
The image below indicates what the most important properties.
 Add an event handler to the button and place in the function the code you
want executed when the user clicks the button.
Add an event handler to the button and place in the function the code you
want executed when the user clicks the button.
In the sample function calls below the variable m_DemoBtn is a CButton variable added to
a button in an application:
m_DemoBtn.EnableWindow(true);               // Make the button active/editable


m_DemoBtn.EnableWindow(false);              // Make the button inactive/not editable


m_DemoBtn.ShowWindow(false);                // Make the button invisible


m_DemoBtn.ShowWindow(true);                 // Make the button visible
And, why do all of these functions refer to a "Window" instead of a "Button"?
Because Microsoft defines every widget in a dialog box as a subclass of
CWnd. That is, a window. Go figure!
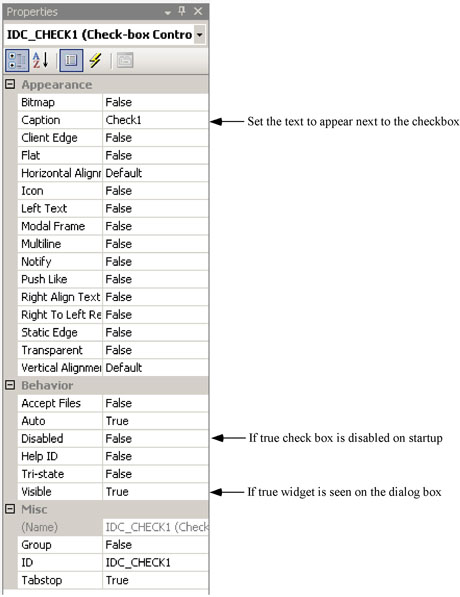
In the dialog resource click the Toolbox
tab and select CheckBox from the list. Use the mouse to click and drag the size
and location of the check box. The height of a check box in the dialog box is constant
but the width of the area set for the check box determines how much of the associated
text will be visible. With the new check box selected you will see the properties listed.
The image below indicates what the most important properties.
 In the sample function calls below the variable m_DemoCB is a CButton variable added to
a check box in an application. And yes, that is a CButton. There is no CCheckBox class:
In the sample function calls below the variable m_DemoCB is a CButton variable added to
a check box in an application. And yes, that is a CButton. There is no CCheckBox class:
bool isChecked = m_DemoCB.GetCheck();     // See if the check box is checked


m_DemoCB.SetCheck(true);                  // Set the checked state, true=checked


m_DemoCB.EnableWindow(true);              // Make the check box active/editable


m_DemoCB.EnableWindow(false);             // Make the check box inactive/not editable


m_DemoCB.ShowWindow(false);               // Make the check box invisible


m_DemoCB.ShowWindow(true);                // Make the check box visible
And, why do all of these functions refer to a "Window" instead of a "Check Box"?
Because Microsoft defines every widget in a dialog box as a subclass of
CWnd. That is, a window. Go figure!
This section is still under construction.
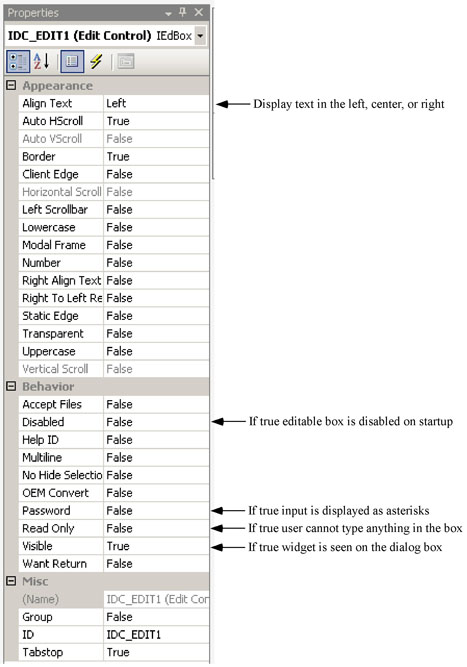
Visual Studio calls a text box an Edit control. In the dialog resource click the Toolbox
tab and select Edit Control from the list. Use the mouse to click and drag the size
and location of the text box. With the new text box selected you will see the properties listed.
The image below indicates what the most important properties.
 In the sample function calls below the variable m_DemoEC is a CEdit variable added to
an Edit Control in an application:
In the sample function calls below the variable m_DemoEC is a CEdit variable added to
an Edit Control in an application:
m_DemoEC.SetWindowText("Just Testing");     // Set the text using a string constant
char line[32];                              // Set the text using a character array
strcpy(line, "Just Testing");
m_DemoEC.SetWindowText(line);


char line[32];                             // Get the text in a character array
m_DemoEC.GetWindowText(line, 31);          // Arg1=char array, Arg2=Max characters to copy


m_DemoEC.EnableWindow(true);               // Make the edit control active/editable


m_DemoEC.EnableWindow(false);              // Make the edit control inactive/not editable


m_DemoEC.ShowWindow(false);                // Make the edit control invisible


m_DemoEC.ShowWindow(true);                 // Make the edit control visible
And, why do all of these functions refer to a "Window" instead of an "Edit Control" or
"Text Box"? Because Microsoft defines every widget in a dialog box as a subclass of
CWnd. That is, a window. Go figure!
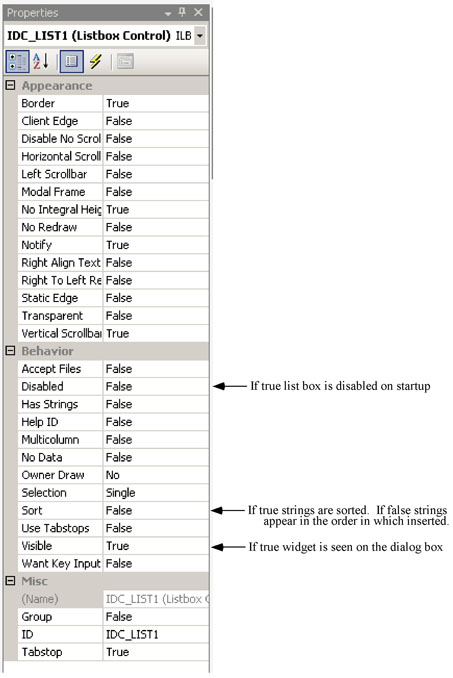
In the dialog resource click the Toolbox
tab and select List Box from the list. Use the mouse to click and drag the size
and location of the list box. With the new list box selected you will see the properties listed.
The image below indicates what the most important properties.
 In the sample function calls below the variable m_DemoLB is a CListBox variable added to
a List Box in an application:
In the sample function calls below the variable m_DemoLB is a CListBox variable added to
a List Box in an application:
m_DemoLB.AddString("Just Testing");     // Add a string to a list box
char line[32];                          // Add a string using a char array
strcpy(line, "Just Testing");
m_DemoLB.AddString(line);


m_DemoLB.GetCurSel();                   // Get the index of the selected item


char line[32];                          // Get the text for a string in a character array
m_DemoLB.GetWindowText(index, line);    // Arg1=index of item starting with 0, Arg2=char array


m_DemoLB.ResetContent();                // Remove all strings from the list box


m_DemoLB.EnableWindow(true);            // Make the list box active/items selectable


m_DemoLB.EnableWindow(false);           // Make the list box inactive/items not selectable


m_DemoLB.ShowWindow(false);             // Make the list box invisible


m_DemoLB.ShowWindow(true);              // Make the list box visible
And, why do all of these functions refer to a "Window" instead of a "List Box"?
Because Microsoft defines every widget in a dialog box as a subclass of
CWnd. That is, a window. Go figure!
This section is still under construction.
When you create a Static Text widget in a GUI it will be given the ID of IDC_STATIC by default. This
goes for all static widgets whether static text or things like group boxes. You wil need to change the
ID property of the Static Text widget. In the code sample below this was changed to IDC_STATIC_DF
where "DF" stood for a Static Text widget with the text set to "Data File". Put this code in the
OnInitDialog() function in your programnameDlg.cpp file.
	// Set font for static text items
	CFont font;
	font.CreatePointFont(18, "Arial", NULL); // 18 point font

	CWnd* pStatic = GetDlgItem(IDC_STATIC_DF);
	pStatic->SetFont(&font);
-
From the Solution Explorer pane right click the Resource folder and select
"Add->Resource" from the popup menu, or right click in the Resource View and
select "Add Resource" from the popup menu.
-
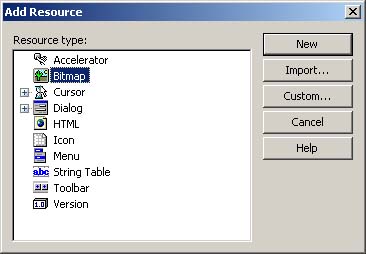
In the dialog box shown below select "Bitmap" then click the Import button.
-
In the open file dialog box that appears locate the .BMP file you want to
import. The bitmap will be added to the resources. Note the ID/Name given
to the bitmap so you can add it where you want it.
-
If you want to display the bitmap image in a Picture Control, then add one
to your dialog box in the Resource Editor. In the properties list for the
Picture Control set the Type property to "Bitmap". Click in the space
to the right of the Image property and select the bitmap from the
dropdown combobox. If needed resize the Picture Control to the correct size
to hold the image.
|
