Creating Projects in Visual Studio
For GUI Applications
During the last few weeks of this course (see the syllabus for exact dates)
we will meet in one of the CS Labs (usually N327 unless there is a class
conflict and then we will meet in N326). During this time we will create
five simple GUI applications using Microsoft Visual Studio. We will also
look at one of those GUIs implemented in Java. The directions
below give step-by-step instructions on how to create each of these projects.
You should follow them carefully.
Warning: Microsoft Visual Studio does strange, unexpected things, which usually also
leads to a program crash, if you try to work on a GUI project on your thumb drive. You
must create the project and work on it on the C drive. When you finish working you
should backup the project to your thumb drive. Do not leave work on the C drive
as it is subject to being deleted, unannounced, by the system administrator.
Click on the appropriate link below for instructions on creating a project for
one of the in-class exercises:
Exercise 1: A very simple first GUI program using the Windows API
-
From the File menu select New->Project. In the New Project dialog box that
appears do the following. Note: Depending on the version of Visual Studio you
are using the dialog box may look slightly different.
-
Select Win32 from the list on the left.
-
Select Win32 Project (NOT Win32 Console Application) from the options on the right.
-
Enter a name for the solution and a name for the project such as FirstWinApp.
-
Click OK.
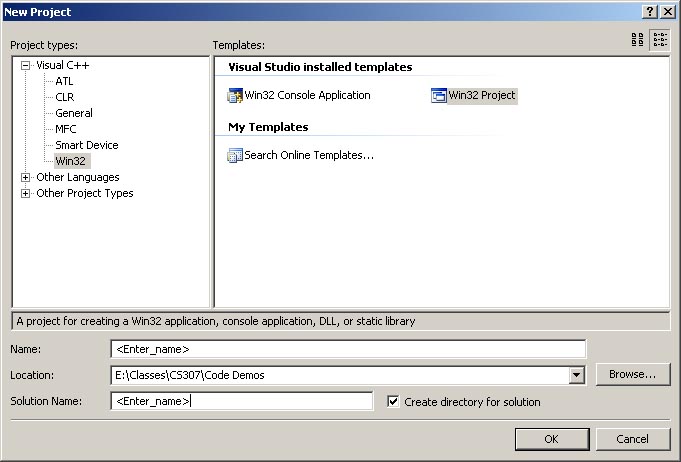
New Project dialog box
-
In the Application Wizard dialog box that now appears do the following:
-
Click Next to go to the Application Settings page (shown below).
-
Make sure that the only things checked are the Windows
application radio button, and Empty Project check box.
-
Click Finish.
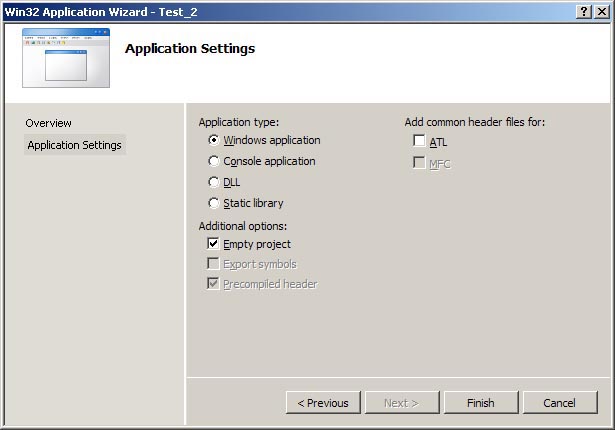
Application Wizard dialog box
-
In the Solution Explorer pane right click the project name and select Properties.
In the Properties dialog box that appears do the following:
-
Click General in the list on the left.
-
Click in the text area to the right of Character Set.
-
In the dropdown combo box select Not Set. This will allow you to use
ordinary character array strings instead of Unicode strings.
-
Click OK.
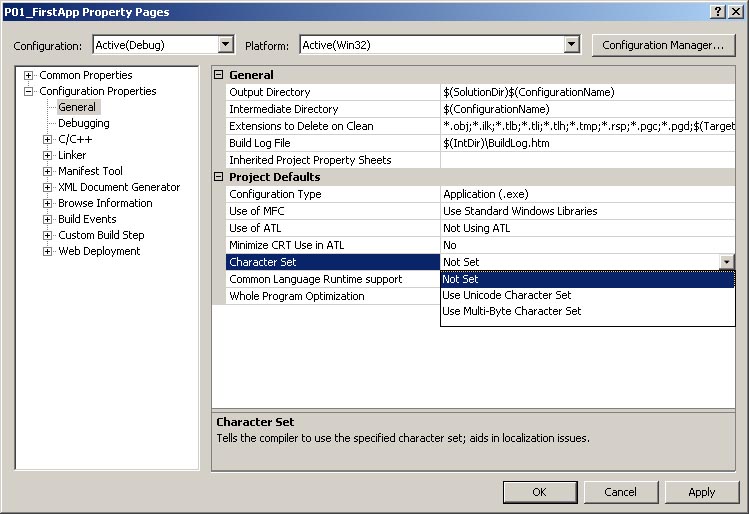
Properties dialog box
-
Click the back button on your browser until you are back to the page listing links
to the exercises then select the Exercise 1 link and be
prepared to follow along as the instructor directs you.
Exercise 2: A simple window program using the Windows API
-
From the File menu select New->Project. In the New Project dialog box that
appears do the following. Note: Depending on the version of Visual Studio you
are using the dialog box may look slightly different.
-
Select Win32 from the list on the left.
-
Select Win32 Project (NOT Win32 Console Application) from the options on the right.
-
Enter a name for the solution and a name for the project, such as SimpleWindow.
-
Click OK.
New Project dialog box
-
In the Application Wizard dialog box that now appears do the following:
-
Click Next to go to the Application Settings page (shown below).
-
Make sure that the only things checked are the Windows
application radio button, and Empty Project check box.
-
Click Finish.
Application Wizard dialog box
-
In the Solution Explorer pane right click the project name and select Properties.
In the Properties dialog box that appears do the following:
-
Click General in the list on the left.
-
Click in the text area to the right of Character Set.
-
In the dropdown combo box select Not Set. This will allow you to use
ordinary character array strings instead of Unicode strings.
-
Click OK.
Properties dialog box
-
Click the back button on your browser until you are back to the page listing links
to the exercises then select the Exercise 2 link and be
prepared to follow along as the instructor directs you.
Exercise 3: A dialog based application using Microsoft Foundation Classes
There are two class exercises which use the Microsoft Foundation Classes. This first one
will be a dialog based application. You should be familiar with dialog boxes but you may not know
that you can create an application whose main window is a dialog box. A dialog based project
in Windows is an easier way to create an application with a complex GUI.
-
From the File menu select New->Project, or if you want to add this project to an existing
solution right click the solution name in the Solution Explorer pane and select
Add->New Project. In the New Project dialog box that
appears do the following:
-
Select MFC from the list on the left.
-
Select MFC Application from the options on the right.
-
Enter a name for the project such as MFCDlgProject.
-
If you are creating a project in a new Solution then
there will also be a text box where you enter a name for the solution.
-
Click OK.
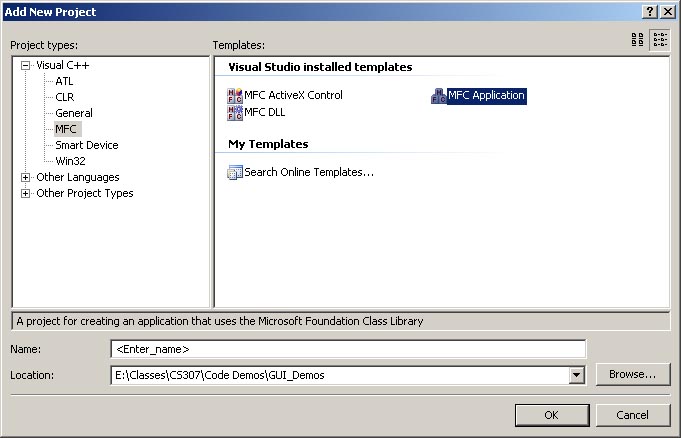
New Project dialog box
-
In the Application Wizard dialog box that now appears do the following:
-
Click Next to go to the Application Settings page.
-
Make sure that all settings match those in the image below.
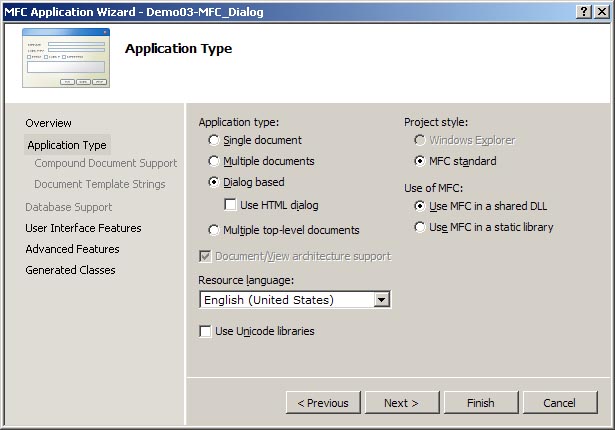
Application Wizard dialog box for Dialog Based Project
-
Click Next.
-
On the User Interface Features page that now appears do the following:
-
Make sure that all settings match those in the image below. These
are the default settings.
-
Click Next.

Application Wizard dialog box
-
On the Advanced Features page (see the image below) that now appears do the following:
-
Check that all settings match those in the image below.
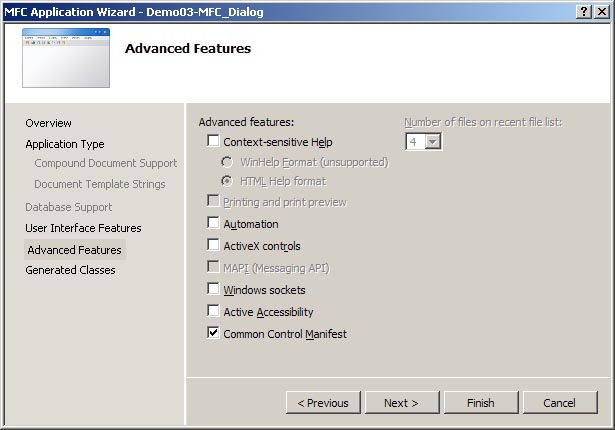
Application Wizard dialog box for Dialog Based Project
-
Click Next.
-
On the Generated Classes page that now appears you will see the
classes that Visual Studio will automatically generate for you for the application.
The image below illustrates what this will look like. The exact names of the classes
will depend on the project name you chose.
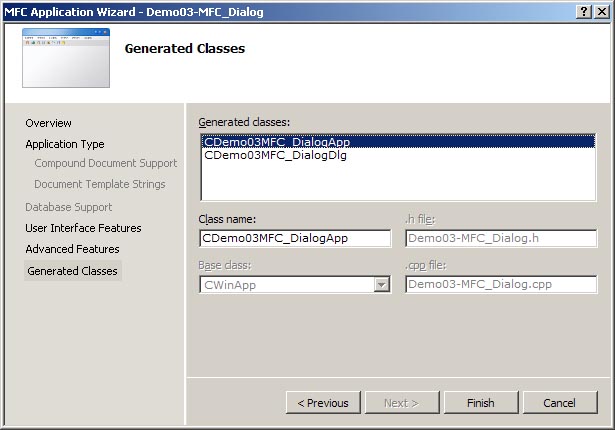
Application Wizard dialog box
-
In the Solution Explorer pane right click the project name and select Properties.
In the Properties dialog box that appears do the following:
-
Click General in the list on the left.
-
Click in the text area to the right of Character Set.
-
In the dropdown combo box select Not Set. This will allow you to use
ordinary character array strings instead of Unicode strings.
-
Click OK.
Properties dialog box
-
Click the back button on your browser until you are back to the page listing links
to the exercises then select the Exercise 3 link and be
prepared to follow along as the instructor directs you.
Exercise 4: A Windows Forms based GUI application using Visual Studio 2010
Warning: Be aware that in previous versions of Microsoft Visual Studio
there was a serious bug (probably has not been fixed by now)
which can cause automatically generated Windows Forms code to produce errors which will cause
the forms editor to display error messages instead of showing your form for editing.
A Google search on one of the errors will result in multiple hits including one
at Microsoft where their technition states: "We are aware of this problem and
isn't it good that people can meet here to discuss it." End of statement. No
"solution" given. No "work around" given. No "we are working on the problem".
So, expect this to possibly be a frustrating exercise. It is recommended that
you create all the widgets for your form before attempting to compile or even
view the source files as just switching to view the Form1.h source file
can sometimes trigger the errors if you have already added widgets to the form.
-
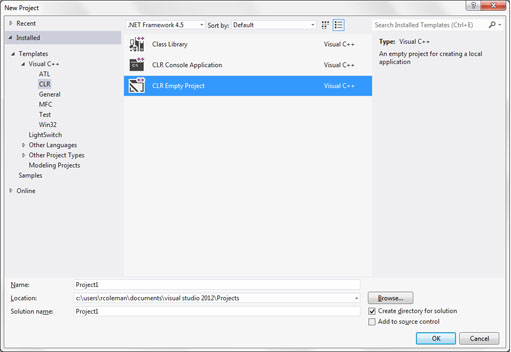
From the File menu select New->Project, or if you want to add this project to an existing
solution right click the solution name in the Solution Explorer pane and select
Add->New Project. In the New Project dialog box that
appears do the following:
-
Select CLR from the list on the left.
-
Select Windows Forms Application from the options on the right.
-
Enter a name for the project such as WinFormsProject.
-
If you are creating a project in a new Solution then
there will also be a text box where you enter a name for the solution.
-
Click OK.
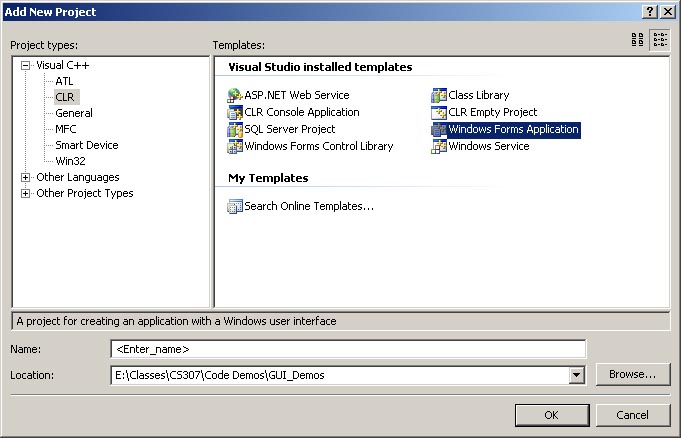
New Project dialog box
-
Visual Studio will generate a number of files for you and place them in the appropriate
location in your project. It will also create the default Forms resource and open it
in the resource editor as shown below.
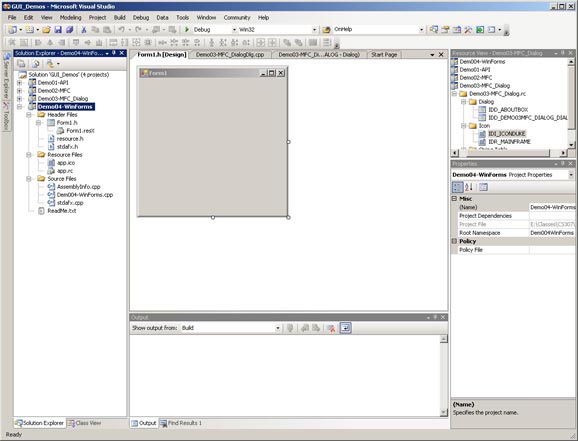
The Form Editor
-
In the Solution Explorer pane right click the project name and select Properties.
In the Properties dialog box that appears do the following:
-
Click General in the list on the left.
-
Click in the text area to the right of Character Set.
-
In the dropdown combo box select Not Set. This will allow you to use
ordinary character array strings instead of Unicode strings.
-
Click OK.
Properties dialog box
-
Click the back button on your browser until you are back to the page listing links
to the exercises then select the Exercise 4 link and be
prepared to follow along as the instructor directs you.
Exercise 4: A Windows Forms based GUI application using Visual Studio 2012
Warning: For some reason Microsoft decided to remove the Windows Forms option
from the Create Application dialog box so you will have to follow the instructions below to create
a Windows Forms application with Visual Studio 2012.
-
From the File menu select New->Project, or if you want to add this project to an existing
solution right click the solution name in the Solution Explorer pane and select
Add->New Project. In the New Project dialog box that
appears do the following:
-
Select CLR under Visual C++ from the list on the left.
-
Select CLR Empty Project from the options on the right.
-
Enter a name for the project such as WinFormsProject. Do not put any spaces
or special characters (like '-' or '_') in the name or you will have a problem.
This is explained below.
-
If you are creating a project in a new Solution then
there will also be a text box where you enter a name for the solution.
-
Click OK.
New Project menus
-
To add a form to the project right-click the Header Files folder in the
Solution Explorer pane. In the pop-up menu select Add->New Item.
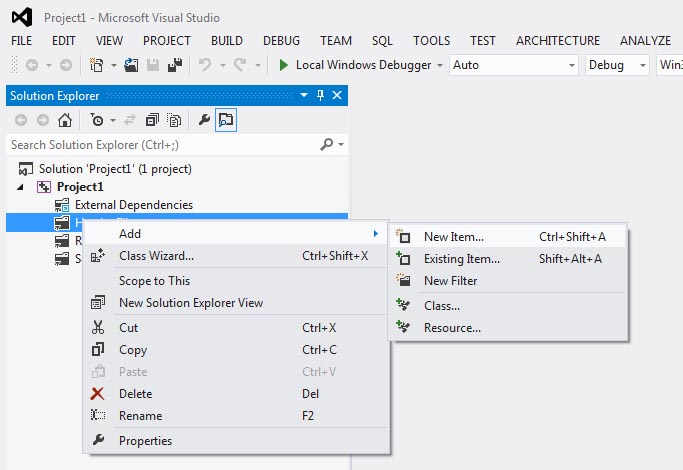
The Form Editor
-
In the dialog box that appears select UI under Visual C++ on the
left then select Windows Form on the right. Finally, click Add.
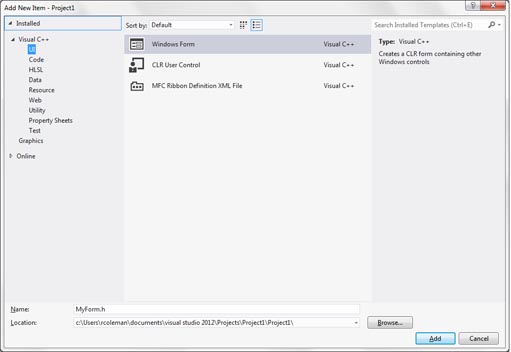
The Form Editor
The form will be added and opened in the visual editor.
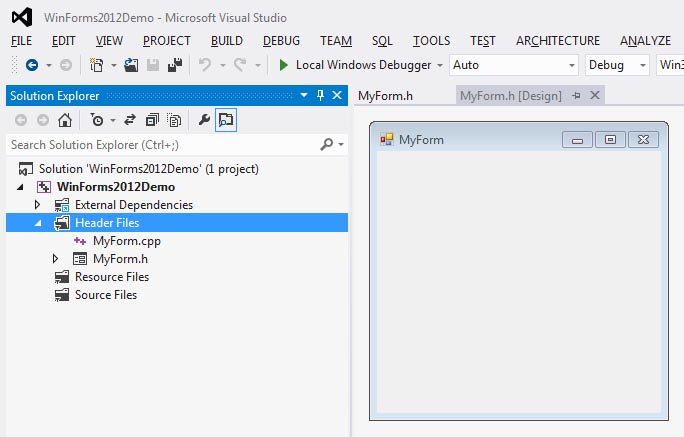
The Form Editor
-
In the Solution Explorer pane right click the project name and select Properties.
In the Properties dialog box that appears do the following:
-
Click General in the list on the left.
-
Click in the text area to the right of Character Set.
-
In the dropdown combo box select Not Set. This will allow you to use
ordinary character array strings instead of Unicode strings.
Properties dialog box
-
Select Linker->System in the list on the left.
-
Click in the text area to the right of Subsystem.
-
In the dropdown combo box select Windows(/SUBSYSTEM:WINDOWS).
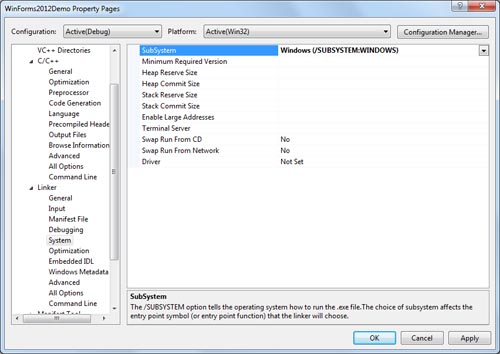
Properties dialog box
-
Select Linker->Advanced in the list on the left.
-
Click in the text area to the right of Entry Point.
-
Type in main as the name of your main function. Click Apply
then click OK.
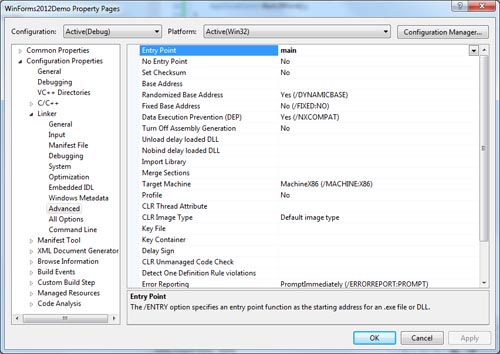
Properties dialog box
-
Click OK.
-
In the Solution Explorer pane of Visual Studio double click the FormName.cpp file that
visual studio has created. It should already have the line #include "FormName.h" at the
top. Add the code shown below to create the basic main function.
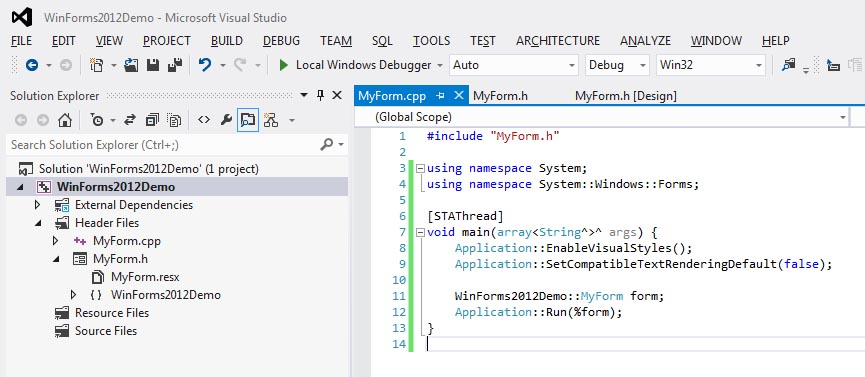
Code for main in WinForms 2012 application
Substitute the name of your project for WinForms2012Demo. (Note: The name of your project
cannot have any spaces or special characters in it or this line will generate an error.)
Also substitute the name of your form for MyForm. For example, in the instructor's
demonstration of WinForms in VS 2012 this line is Demo4WinForms::Form1 form;.
You can now compile and run the application to display the basic forms window.
-
Click the back button on your browser until you are back to the page listing links
to the exercises then select the Exercise 4 link and be
prepared to follow along as the instructor directs you.
Exercise 4: A Windows Forms based GUI application using Visual Studio 2017
Warning: For some reason Microsoft decided to remove the Windows Forms option
from the Create Application dialog box so you will have to follow the instructions below to create
a Windows Forms application with Visual Studio 2017.
Click here
to download a Word document showing how to create a WinForms application in VS 2017. Note:
the instructor has not tried this so cannot varify it will work.
In Class Demonstration: Developing GUIs using Java on any platform
This exercise demonstrates how to develop GUIs in Java using the Eclipse compiler. You will
not do this exercise in class, but the instructor will show you the code and explain how it is
put together. The reason for including a Java demonstration program in a C++ class is that it
is easier to visualize the Object Oriented structure of a GUI program using Java than it is
in a Visual Studio GUI project.
Exercise 5: A Single Document application using Microsoft Foundation Classes
-
From the File menu select New->Project, or if you want to add this project to an existing
solution right click the solution name in the Solution Explorer pane and select
Add->New Project. In the New Project dialog box that
appears do the following:
-
Select MFC from the list on the left.
-
Select MFC Application from the options on the right.
-
Enter a name for the project. For this exercise
call the project Sketcher.
-
If you are creating a project in a new Solution then
there will also be a text box where you enter a name for the solution.
-
Click OK.
New Project dialog box
-
In the Application Wizard dialog box that now appears do the following:
-
Click Next to go to the Application Settings page.
-
Check Single Document instead of Dialog based.
-
Check Document/View architecture support.
-
Uncheck Use Unicode Libraries.
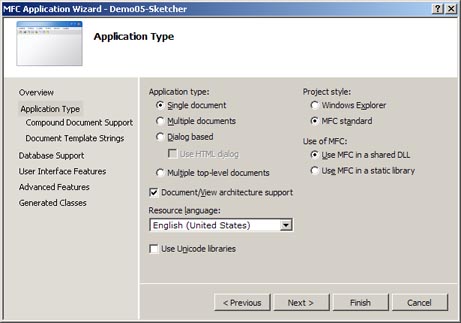
Application Wizard dialog box for SDI Project
-
Click Next.
-
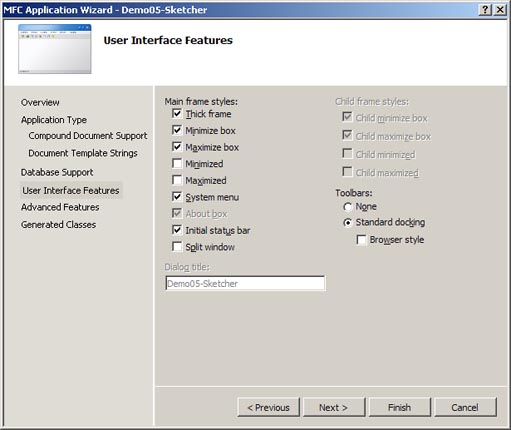
On the User Interface Features page that now appears do the following:
-
Check that all settings match those in the image below. These are
the default settings.
-
If you are working with Visual Studio 2012 or later then you
need to select the radiobutton for Use a menubar and toolbar
with both User-defined toolbars and images and Personalized
menu behavior checked.
-
Click Next.
Application Wizard dialog box
-
On the Advanced Features page that now appears do the following:
-
Check that all settings match those in the image below.
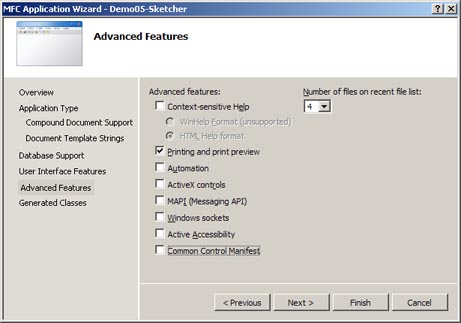
Figure 4b: Application Wizard dialog box for SDI Project
-
Click Next.
-
On the Generated Classes page that now appears you will see the
classes that Visual Studio will automatically generate for you for the application.
-
In the Solution Explorer pane right click the project name and select Properties.
In the Properties dialog box that appears do the following:
-
Click General in the list on the left.
-
Click in the text area to the right of Character Set.
-
In the dropdown combo box select Not Set. This will allow you to use
ordinary character array strings instead of Unicode strings.
-
Click OK.
Properties dialog box
-
Click the back button on your browser until you are back to the page listing links
to the exercises then select the Exercise 5 link and be
prepared to follow along as the instructor directs you.