Building Graphical User Interfaces (GUIs)
Using Windows Forms
All of these examples assume that Microsoft Visual C++ 2010 or 2012 is the compiler being used.
Before you begin this project go back to the "project creation" page and make sure you
have followed ALL of the directions on creating this project, including (1) setting the correct
SUBSYSTEM for the Linker, (2)setting main() as the ENTRY POINT for the application, and (3)
adding code for main() in ApplicationNameForm.cpp.
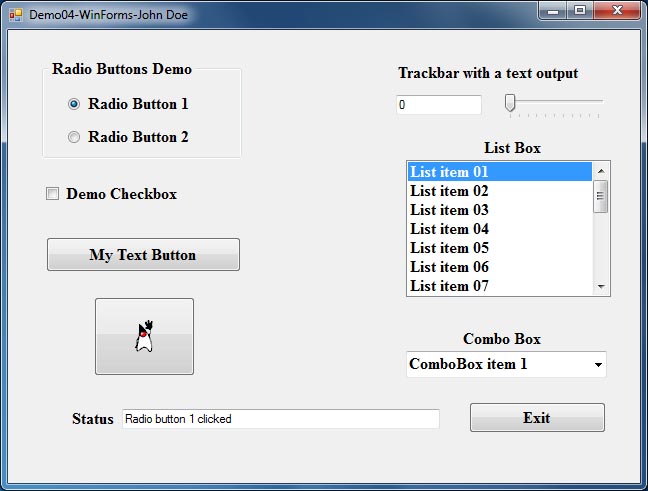
Exercise 4: A Windows Forms application
In this application you are going to build a Windows Forms application with a look similar to
the MFC Dialog based application.
If you have not already created the WinFormsProject project then click
back on your browser and click the link Creating Projects in Visual Studio
for GUI applications and follow the instructions for creating the project
for exercise 4.
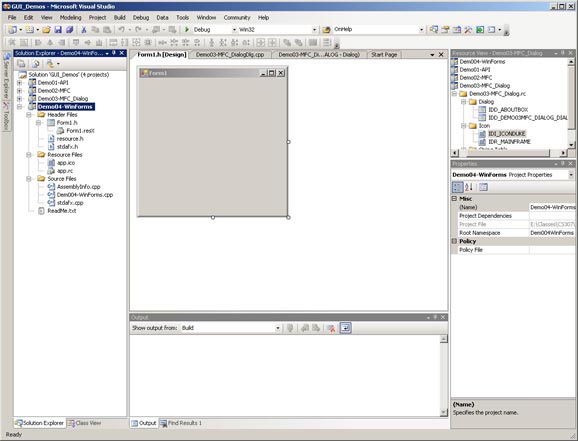
The Files Visual Studio Created
Take a look at the files Visual Studio created automatically for you when you created the Windows Forms project. The
image below shows the listing of those files from the demonstration program shown in class using VS 2010. The files
in your WinForms project will be different if you are using VS 2012 or later.

Form1.h
Right click this file in the Solution Explorer and select View Code
-
This file is where Visual Studio automatically writes code as you
build your application. Note that all this code is placed in a .h
file which goes completely against the conventional C++ programming style of
putting code in a .cpp file. In Form1.h there are two
functions you should notice:
-
The Constructor. Note that this first calls InitializeComponent()
and then has a comment "//TODO: Add the constructor code here". This is where
you want to add your code to initialize any components and/or member variables.
For example, here is where you would set the initial selected index of items
in list boxes or combo boxes. Do not attempt to do it in the InitializeComponent()
function (which would seem to be the logical place to do it) because every time
you make a change in the form using the form designer it rewrites this function
and will overwrite any initializations you put there.
-
InitializeComponent(). As you add and modify widgets in the Form Designer
window Visual Studio modifies this function to add the code to create and set
the properties of all the widgets.
-
Event Handlers. As you add event handler functions for each of the
widgets in your Forms GUI they will be created for you below the
InitializeComponent() function.
Building the GUI
If the Form Editor is not already open showing Form1, open it by
double clicking Form1.h in the Solution Explorer window.
Look at the left or right edge of the Visual Studio window and find where the Toolbox tab
is located. When you click this it expands to display all the widgets you can add to the form.
There are a number of catagories of widgets. You want to expand the All Windows Forms
widgets.
You can now build your GUI by clicking a widget in the list then clicking in the form
where you would like to creat the widget. Below you will find notes on how to create the
demonstration form shown above. You may copy it or feel free to experiment
with your own layout and design.
Note: You will add the radio buttons and group widgets last as this can sometimes
cause the errors mentioned above.
Build the GUI
Form1 window
-
In the Properties list change the Text Property (window title) to the name of your project and
replace John Doe as seen in the title of the above example with your name.
-
Set the Size Property to 640 x 480
CheckBox
-
Create a CheckBox by selecting it in the Toolbox then click on the form where you
want to create it.
-
Set the Text Property to "Demo Check Box"
-
Set the Font Property to Times New Roman, bold, 12
-
Double click the CheckBox to create an event handler function in Form1.h.
�Text Button
-
Create a Button by selecting it in the Toolbox then click on the form where you
want to create it.
-
Set the Text Property to "My Text Button"
-
Set the Font Property to Times New Roman, bold, 12
-
Double click the Button to create an event handler function in Form1.h.
Image Button
-
You will need to prepare an image for the button. You can
create an icon resource just as you did in the previous exercise, or copy
any .ico file from another directory into the project
directory. You can also use an image (.JPG, .GIF, .BMP, .PNG). Just copy
it into your project directory. If you use an image file it must already
be the correct size to fit on the button. It will not be resized by Visual
Studio.
-
Create a button by selecting it in the Toolbox then click and drag on the form
to create and size the button.
-
Select the Image property then click in the right column to show the select
image dialog box. An Open File dialog box will appear that will let you
select the image or icon file to use. (You may see a different type of dialog box
in which you will have to (1) click the "Local Resource" radio button, (2) click
the "Import" button, (3) select "All Files" in the combobox in the lower right of
the Open File dialog box that appears, (4) Use this Open File dialog box to select
the icon or image to load. )
-
Double click the Button to create an event handler function in Form1.h.
"Status" Label
-
Create a Label by selecting it in the Toolbox then click on the form where you
want to create it.
-
Set the Text Property to "Status"
-
Set the Font Property to Times New Roman, bold, 12
TextBox for status output
-
Create a TextBox next to the Status label by selecting it in the Toolbox then click
on the form where you want to create it.
-
Set the Font Property to Times New Roman, bold, 12
"TrackBar with a text output" Label
-
Create a Label by selecting it in the Toolbox then click on the form where you
want to create it.
-
Set the Text Property to "TrackBar with a text output"
-
Set the Font Property to Times New Roman, bold, 12
TextBox for trackbar output
-
Create a TextBox by selecting it in the Toolbox then click on the form where you
want to create it.
-
Set the Font Property to Times New Roman, bold, 12
TrackBar
-
Create a TrackBar by selecting it in the Toolbox then click on the form where you
want to create it.
-
Set the Maximum Property to 100
-
Set the TickFrequency Property to 10
-
Double click the TrackBar to create an event handler function in Form1.h.
ListBox
-
Create a ListBox by selecting it in the Toolbox then click on the form where you
want to create it.
-
Set the Font Property to Times New Roman, bold, 12
-
Double click the ListBox to create an event handler function in Form1.h.
ComboBox
-
Create a ComboBox by selecting it in the Toolbox then click on the form where you
want to create it.
-
Set the Font Property to Times New Roman, bold, 12
-
Double click the ComboBox to create an event handler function in Form1.h.
Exit Button
-
Create a Button by selecting it in the Toolbox then click on the form where you
want to create it.
-
Set the Text Property to "Exit"
-
Set the Font Property to Times New Roman, bold, 12
-
Double click the Button to create an event handler function in Form1.h.
�Do this last because of the circular error problem that is a Visual Studio bug.
GroupBox
-
Create a GroupBox by selecting it in the Toolbox then click on the form where you
want to create it.
-
Set the Text Property to "Radio Button Demo"
-
Set the Font Property to Times New Roman, bold, 12
Two RadioButtons
-
Create two RadioButtons in the GroupBox by selecting RadioButton the Toolbox then click
inside the boundary of the GroupBox to create each one.
-
Set the Text Properties to "Radio Button 1" and "Radio Button 2"
-
Set the Font Property of each to Times New Roman, bold, 12
-
Double click each RadioButton to create an event handler function in Form1.h.
Add code to add items to the list box and the combobox
-
List box - Look in the constructor for Form1 and add code after the call to
InitializeComponent() to add items to the list box.
	public ref class Form1 : public System::Windows::Forms::Form
	{
	public:
		Form1(void)
		{
			InitializeComponent();
			//
			//TODO: Add the constructor code here
			//
			this->listBox1->Items->Add("List item 01");
			this->listBox1->Items->Add("List item 02");
			this->listBox1->Items->Add("List item 03");
			this->listBox1->Items->Add("List item 04");
			this->listBox1->Items->Add("List item 05");
			this->listBox1->Items->Add("List item 06");
			this->listBox1->Items->Add("List item 07");
			this->listBox1->Items->Add("List item 08");
			this->listBox1->Items->Add("List item 09");
			this->listBox1->Items->Add("List item 10");
			this->listBox1->SelectedIndex = 0;
-
Combo box - Look in the constructor for Form1 and add code after the call to
InitializeComponent() to add items to the combo box.
			this->comboBox1->Items->Add("Combobox item 01");
			this->comboBox1->Items->Add("Combobox item 02");
			this->comboBox1->Items->Add("Combobox item 03");
			this->comboBox1->Items->Add("Combobox item 04");
			this->comboBox1->Items->Add("Combobox item 05");
			this->comboBox1->SelectedIndex = 0;
Add code to the event handlers
-
RadioButtons, CheckBox, text Button, and icon Button
-
Look in Form1.h close to the top and you should see a list of variable
names for each of the widgets created. Look for the one for the "Status"
TextBox and note the name of the widget (textBox1 in this example):
private: System::Windows::Forms::TextBox^ textBox1;
-
Find the event handler function for each of the named widgets above and add
a line similar to the one below, which is for the first radio button.
this->textBox1->Text = "Radio button 1 clicked";
-
You can also do a check to determine if the check box is checked with:
if(this->checkBox1->Checked)
List box
Find the event handler for the list box and add the following code to display the
selected line in the status text box
this->textBox1->Text = (System::String ^)(this->listBox1->Items[this->listBox1->SelectedIndex]) + " selected";
Combo box
Find the event handler for the combo box and add the following code to display the
selected line in the status text box
this->textBox1->Text = (System::String ^)(this->comboBox1->Items[this->comboBox1->SelectedIndex]) + " selected";
TrackBar
-
Look in Form1.h close to the top and you should see a list of variable names for
each of the widgets created. Look for the one for the trackbar text box and note
the name of the widget (textBox2 in this example).
private: System::Windows::Forms::TextBox^ textBox2;
-
Find the event handler function for the TrackBar and add the line below
this->textBox2->Text = this->trackBar1->Value.ToString();
Exit button
Find the event handler for the Exit button and add the following code to terminate the
application when it is clicked.
this->Close();
Compile and run your application. Play with the widgets to see how they work.
Try adding and experimenting with other widgets
For more information on any of the widgets try doing a Google search
on the widget name +"windows forms".