Building Graphical User Interfaces (GUIs)
Using the Windows Application Programming Interface (API)
All of these examples assume that Microsoft Visual C++ 2010 or 2012 is the compiler being used.
Exercise 2: A simple window program
Now you are going to write a program which will create and display a simple window, register a
callback function with the operating system, and wait for the operating sytem to pass it event
messages. As simple as this program is it illustrates the basic functionality of ALL
GUI programs you have ever seen or will ever write.
-
If you have not already created the SimpleWindow project then click
back on your browser and click the link Creating Projects in Visual Studio
for GUI applications and follow the instructions for creating the project
for exercise 2.
-
Add a .cpp source file to the project. (Right click Source Files and select
Add->New item. In the dialog box select .cpp file and give it a name
like SimpleWinMain.cpp.
-
Copy and paste the following text into the .cpp file changing John Doe to your
name in step 2, Creating the Window:
#include <windows.h>

// Create the window name
const char g_szClassName[] = "myWindowClass";

// Step 4: the Window Procedure
LRESULT CALLBACK WndProc(HWND hwnd, UINT msg, WPARAM wParam, LPARAM lParam)
{
    switch(msg)
    {
        case WM_CLOSE:
            DestroyWindow(hwnd);
            break;
        case WM_DESTROY:
            PostQuitMessage(0);
            break;
        default:
            return DefWindowProc(hwnd, msg, wParam, lParam);
    }
    return 0;
}

int WINAPI WinMain(HINSTANCE hInstance, HINSTANCE hPrevInstance,
    LPSTR lpCmdLine, int nCmdShow)
{
    WNDCLASSEX wc;
    HWND hwnd;
    MSG Msg;

    //Step 1: Registering the Window Class (Note: "Class" as used here means "Type" and
    //                                        is not the same as a C++ class

    // Define the window characteristics
    wc.cbSize        = sizeof(WNDCLASSEX);              // Size in bytes of the struct
    wc.style         = 0;                               // Class style, usually set to 0
    wc.lpfnWndProc   = WndProc;                         // Call back function
    wc.cbClsExtra    = 0;                               // Extra data in memory, usually 0
    wc.cbWndExtra    = 0;                               // Extra data for win of this type, usually 0
    wc.hInstance     = hInstance;                       // Handle to this application
    wc.hIcon         = LoadIcon(NULL, IDI_APPLICATION); // Large icon. Shown when user presses Alt-Tab
    wc.hCursor       = LoadCursor(NULL, IDC_ARROW);     // Cursor to use
    wc.hbrBackground = (HBRUSH)(COLOR_WINDOW+1);        // Background color--White here.
    wc.lpszMenuName  = NULL;                            // Name of a menu resource. NULL if no menu bar.
    wc.lpszClassName = g_szClassName;                   // Name of the window class
    wc.hIconSm       = LoadIcon(NULL, IDI_APPLICATION); // Small icon for title bar

    // Call the function to register the window class type with Windows OS
    if(!RegisterClassEx(&wc))
    {
        MessageBox(NULL, "Window Registration Failed!", "Error!",
            MB_ICONEXCLAMATION | MB_OK);
        return 0;
    }

    // Step 2: Creating the Window
    hwnd = CreateWindowEx(
        WS_EX_CLIENTEDGE,        // Extended windows style.  This sets a sunken border
        g_szClassName,            // Name of the window class to use
        "A Simple Window App-John Doe", // Title to show in the title bar-Change John Doe to your name.
        WS_OVERLAPPEDWINDOW,    // Window style parameter.  There are quite a few. Look'em up.
        CW_USEDEFAULT, CW_USEDEFAULT, 640, 480, // X,Y location on screen, width, height
        NULL, NULL, hInstance, NULL); // Parent handle, menu handle, app handle, window creation data

    if(hwnd == NULL)
    {
        MessageBox(NULL, "Window Creation Failed!", "Error!",
            MB_ICONEXCLAMATION | MB_OK);
        return 0;
    }

    ShowWindow(hwnd, nCmdShow);
    UpdateWindow(hwnd);

    // Step 3: The Message Loop
    while(GetMessage(&Msg, NULL, 0, 0) > 0)
    {
        TranslateMessage(&Msg);
        DispatchMessage(&Msg);
    }
    return (int)Msg.wParam; // Cast the WPARAM to an int value to keep the compiler happy
}
-
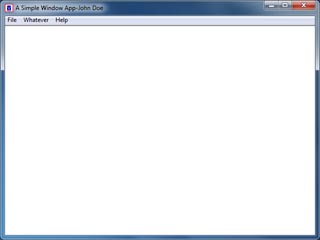
Compile and run the application. You should see a window like the
one below appear. Click the close box in the upper right corner to close the
window and terminate the application.
What's it all mean?
-
Two Functions � There are two functions in this program WinMain and
WndProc. Now, what does each do?
WinMain((HINSTANCE hInstance, HINSTANCE hPrevInstance, LPSTR lpCmdLine, int nCmdShow)
For an explanation of the arguments see the first exercise.
-
Creates a WNDCLASSEX structure (that�s Wind Class X, not Wind Class Sex.
Let's keep the programming clean ;-)), and defines all the window characteristics,
among which are the size of the window, its� location on the screen, the callback
function, the icon to show in the title bar, and the cursor to use. Note that the
term Window class here means a window type. It does not mean class
in the sense of a C++ class.
-
Registers the window type with the OS.
-
Creates a window of that type.
-
Shows the window.
-
Redraws the window
-
Enters a loop to request and pump messages. It is important to note that
the call to GetMessage is a different type of function call. If
no message is available it blocks. That means, the operating system
does not return control to the program, but instead goes off and works on
other tasks. When a message is ready the function returns. The two
commands inside the loop prepare the message for processing and then ask
the operating system (via DispatchMessage(&Msg)) to pass the message to
the application's registered callback function WndProc. This is an
infinite loop and continues until the application is terminated in the
WndProc function.
LRESULT CALLBACK WndProc(HWND hwnd, UINT msg, WPARAM wParam, LPARAM lParam)
This is the callback function that WinMain() registers with the operating system. When
an event happens in the application window the OS passes that event message to this function.
The arguments are:
-
HWND hwnd � A handle to the window which should receive the message.
Handy to know if you have more than one window open for your application.
-
UINT msg � An unsigned int defining the message type which is checked
in the switch statement.
-
WPARAM wParam � This carries additional information about the message.
More on this later.
-
LPARAM lParam � This carries additional information about the message.
More on this later.
This function does the following:
-
Switches on the message type and if it is a type that the program handles
calls the appropriate function to do so or just handles it within the
case statement.
-
If the message type is not one that WndProc handles the switch falls into
the default action and then it returns the message to the operating system
via DefWindowProc(hwnd, msg, wParam, lParam); so that the operating system
can then handle it.
-
When you click the close button on the window a sequence of events is set
into action.
-
The OS sends sends the WM_CLOSE message which results in the
DestroyWindow() function being called.
-
The DestroyWindow() function causes the operating system
to send the WM_DESTROY message which in turn results in the
PostQuitMessage() being called.
-
The PostQuitMessage() causes the operating system
to send the WM_QUIT message to the message loop in WinMain
causing the application to terminate because it will also
make the call to GetMessage() return FALSE. When that happens
the message loop terminates, we stop processing messages and exit
the program. Yes, it sounds a bit convoluted but follow it through
one time to see what is happening then just add it to your code
each time and don't worry about it.
Now you have a real Window's program. It doesn't do much but you can now modify this simple
program to do much more. Next we'll add some more event handlers so the program can handle
mouse events.
Adding Mouse Events to the Simple Window Program
You are now going to expand the simple window program to add the ability to handle mouse button down events.
Add the following code to the switch statement in WndProc:
    case WM_LBUTTONDOWN :    // Handle left mouse button down
    {
        char sFileName[MAX_PATH];
        HINSTANCE hInstance = GetModuleHandle(NULL);
        GetModuleFileName(hInstance, sFileName, MAX_PATH);
        MessageBox(hwnd, sFileName, "This program is:", MB_OK | MB_ICONINFORMATION);
    }
    break;
    case WM_MBUTTONDOWN :    // Handle middle mouse button down
        MessageBox(hwnd, "That was the middle button. Click the left one.",
                       "Button Press Report", MB_OK | MB_ICONINFORMATION);
        break;
    case WM_RBUTTONDOWN :    // Handle right mouse button down
        MessageBox(hwnd, "That was the right button. Click the left one.",
                       "Button Press Report", MB_OK | MB_ICONINFORMATION);
        break;
What's it all mean?
-
The three new events we have added are WM_LBUTTONDOWN, WM_MBUTTONDOWN, and
WM_RBUTTONDOWN. It should be obvious from the names what these events are.
-
On WM_LBUTTONDOWN we are going to get the path and name of this application and
display it in a MessageBox. BTW: Note that the code in this case statement has been
enclosed in a set of curly brackets ({}). This is required in a case statement if you
declare any new variables (like the character array sFileName within the code
for that case.
-
On WM_MBUTTONDOWN and WM_RBUTTONDOWN we are just going to display a
MessageBox telling the user which button was pressed.
Now compile and run the new version of Simple Window. Click the left, right, and middle mouse buttons
in the window to see what happens. Try some other variations on what to do for these events if you
want to experiment with the code.
Adding a menu bar to the Simple Window Program
To add a menubar to the application you will have to use the Visual Studio resource editor.
So do the following:
-
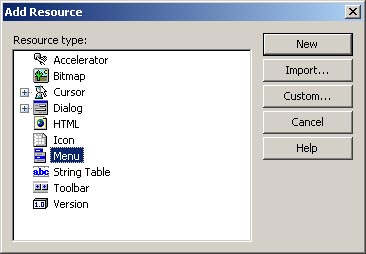
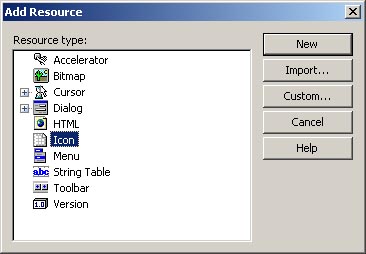
Right click the Resource Files folder in the simple window project and select
Add->Resource. The Add Resource dialog box shown below will appear.
Select Menu from the list and click New.
-
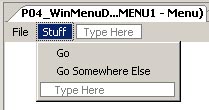
The Menu Resource Editor will open.
Any place where you see "Type Here" you can add a new Menu or Menu Item. If you select
a menu item a "Type Here" will also appear to the right of the item in case you want to
create a sub-menu for a menu item. The two images below show the details of the
menu items added for this demonstration.
-
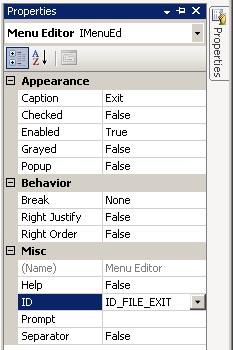
When you select any of the menu items note the ID field in the Properties pane.
The image below shows that for the Exit option under the file menu the defined
ID is ID_FILE_EXIT. You will need to make note of the IDs of all menu items.
-
When you have finished creating the menus save the resource.
Now you are ready to add the code to handle the menu items. First find the line where the
window class is being defined that reads wc.lpszMenuName = NULL;. Make the change shown below
to this line to add the menu bar to the window definition. This assumes that the ID of the menu resource
you added is IDR_MENU1 (the default ID). Don't forget to add #include "resource.h" at the top of this file
or you will see an error on MAKEINRESOURCE.
wc.lpszMenuName = MAKEINTRESOURCE(IDR_MENU1); // ID of a menu resource.
Next add the code to handle the menu selection events. Note that we have added another
case statement to the switch statement in WndProc just above the left mouse button
down handler. The Event we are looking for is the WM_COMMAND. The ID of
the specific menu item selected can be found in the lower 16 bits of the wParam
argument. Fortunately there is an easy macro called LOWORD which gets
this for you. You can then switch on this value and the cases in the switch are
the IDs for each of the menu items. In this simple demonstration all we do is
pop up a message box letting us know which menu item was selected. Later you
can add additional code if you wish to handle each item. The code below does
show you what to add to handle the File->Exit menu option.
    switch(msg)
    {
        case WM_COMMAND :    // Handle menu selections
            switch(LOWORD(wParam))
            {
                case ID_FILE_NEW_:
                    MessageBox(hwnd, "File->New selected", "Menu Report",
                        MB_OK | MB_ICONINFORMATION);
                    break;
                case ID_FILE_OPEN_:
                    MessageBox(hwnd, "File->Open selected", "Menu Report",
                        MB_OK | MB_ICONINFORMATION);
                    break;
                case ID_FILE_EXIT: // Handle exit same as clicking [X] button
                    DestroyWindow(hwnd);
                    break;
                case ID_STUFF_GO:
                    MessageBox(hwnd, "Stuff->Go", "Menu Report",
                        MB_OK | MB_ICONINFORMATION);
                    break;
                case ID_STUFF_GOSOMEWHEREELSE:
                    MessageBox(hwnd, "Stuff->Go Somewhere Else selected.", "Menu Report",
                        MB_OK | MB_ICONINFORMATION);
                    break;
            }
            break;
        case WM_LBUTTONDOWN :    // Handle left mouse button down
            {
Adding a special icon to the Simple Window Program
Just for fun let's add a special icon to be displayed in the title bar of our window and
a larger version which will be displayed if the user presses Alt-Tab on the keyboard to
switch between running applications. Again you will have to use the Visual Studio resource editor.
So do the following:
-
Right click the Resource Files folder in the simple window project and select
Add->Resource. The Add Resource dialog box shown below will appear.
Select Icon from the list and click New.
-
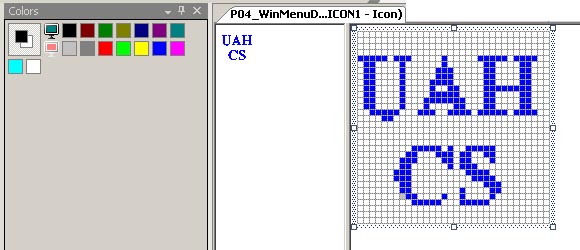
The Icon Resource Editor will open.
You can now use the tools in the drawing tools toolbar that appears to draw a 32 x 32
4-bit, pixel icon.

-
When you have finished drawing the icon save the resource.
Now modify the window definition code in WinMain to add the icon. The first line shown below
will load the icon for display when the user presses Alt-Tab. The last line will create
a 16x16 pixel copy of the 32x32 icon and place it in the title bar of your application.
    wc.hIcon         = LoadIcon(GetModuleHandle(NULL), MAKEINTRESOURCE(IDI_ICON1));
    wc.hCursor       = LoadCursor(NULL, IDC_ARROW);        // Cursor to use
    wc.hbrBackground = (HBRUSH)(COLOR_WINDOW+1);           // Background color--White here.
    wc.lpszMenuName  = MAKEINTRESOURCE(IDR_MENU1);         // Name of a menu resource.
    wc.lpszClassName = g_szClassName;                      // Name of the window class
    wc.hIconSm       = (HICON)LoadImage(GetModuleHandle(NULL), MAKEINTRESOURCE(IDI_ICON1),
                            IMAGE_ICON, 32, 32, 0);        // Small icon for title
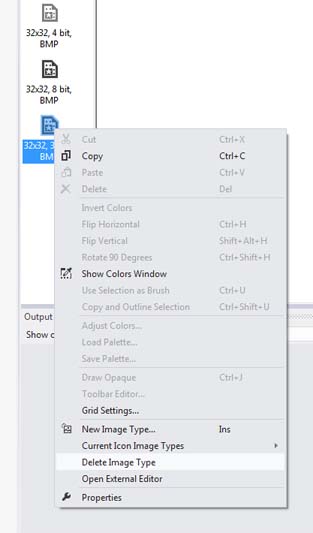
NOTE: If the icon you created does not show then go back to the visual editor and right
click the other icon sizes in the list and select Delete Image Type. Of the 32x32
bit images leave only the one you edited. This will force Visual Studio to use your icon
to display in the window.
You've come a long way in this short tutorial. Take a look at what you have done and
play around with some variations on the code. Programming with the Windows API is definitely
the hardest part of GUI programming in a Windows environment.