Sample Test 3
Design and implement a program in Java that meets ALL of the following requirements. Use
the blank at the beginning of each requirement to check off each completed item.
-
_____ 1. Create a new project in Eclipse and call it Test3Project.
-
_____ 2. Add a class to the project and call it Test3Main. This class must have
the following properties:
-
_____ Place the main() function in this class.
-
_____ Make this class a sub-class of JFrame.
-
_____ Set the size to 320 pixels wide by 240 pixels high.
-
_____ Set the location on the screen to 100 pixels across and 100 pixels down.
-
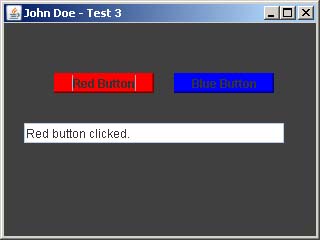
_____ Set the title of the JFrame to Your Name - Test 3.
-
_____ Set the default close operation to EXIT_ON_CLOSE.
-
_____ Place in a comment at the top of the source file the following.
//--------------------------------------------------------------------------
// This program is entirely my work and was completed during the time limits
//  of the test.
//
// Type your name here
//--------------------------------------------------------------------------
Files without this comment will not be accepted for credit.
-
_____ 3. Add a JPanel reference variable to the Test3Main class and create a new
JPanel in the class constructor. You may name the JPanel anything
you wish. This panel must have the following properties:
-
_____ Set the size to 320 pixels wide by 240 pixels high.
-
_____ Set the location to 0, 0.
-
_____ Set the background color to DARK_GRAY.
-
_____ Set the layout to null.
-
_____ Add the panel to the JFrame's content pane.
-
_____ 4. Add two JButtons reference variables to the Test3Main class and create two new
JButtons in the class constructor. You may name the JButton variables anything
you wish. This buttons must have the following properties:
Button 1
-
_____ Set the button text to Red Button.
-
_____ Set the size to 100 pixels wide by 20 pixels high.
-
_____ Set the location to 50, 50.
-
_____ Set the background color to RED.
-
_____ Give the button a RAISED border.
-
_____ Add an action listener to the button that will print
"Red button clicked" in the text field below when the button is clicked.
-
_____ Add the button to the JPanel described above.
Button 2
-
_____ Set the button text to Blue Button.
-
_____ Set the size to 100 pixels wide by 20 pixels high.
-
_____ Set the location to 170, 50.
-
_____ Set the background color to BLUE.
-
_____ Give the button a RAISED border.
-
_____ Add an action listener to the button that will print
"Blue button clicked" in the text field below when the button is clicked.
-
_____ Add the button to the JPanel described above.
-
_____ 5. Add a JTextField reference variable to the Test3Main class and create a new
JTextField in the class constructor. You may name the JTextField variables anything
you wish. This JTextField must have the following properties:
-
_____ Set the size to 260 pixels wide by 20 pixels high.
-
_____ Set the location to 20, 100.
-
_____ Set the editable property to false.
-
_____ Set the background color to WHITE.
-
_____ Add the text field to the JPanel described above.
-
_____ 6. Compile and run your program to be sure it works as it should.
-
_____ 7. Create an executable JAR file from your program. You may name the
JAR file anything you wish.
-
_____ 8. On your thumb drive create a new folder and name it with your name, for
example: John Doe would create a folder and name it jdoe.
-
_____ 9. Copy both the .java source file and the executable JAR file
into this folder then copy the folder onto the K drive.
Note: The instructor will be monitoring the K drive during class and will immediately
copy your folder from K to his thumb drive and delete the folder from drive K. Any folders appearing
on drive K after the end of class or from anyone who has already left class will not be accepted.
|