Drawing in a Nutshell
	// The one and only window has been initialized, so show and update it
	m_pMainWnd->SetWindowText("Sketcher-John Doe");
	m_pMainWnd->ShowWindow(SW_SHOW);
	m_pMainWnd->UpdateWindow();
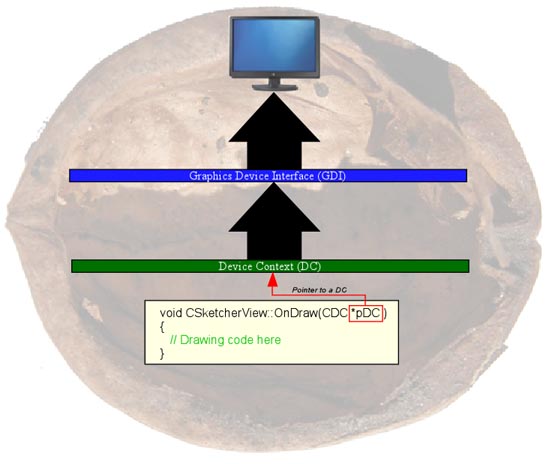
Change "John Doe" in the text in the call to SetWindowText to your name.void CSketcherView::OnDraw(CDC *pDC);(Note: when the View class is created this is defined as OnDraw(CDC* /*pDC*/) so you can give the Device Context pointer any name you want. For now just uncomment and use the default pDC name.)
	m_pMainWnd->ShowWindow(SW_SHOW);
	m_pMainWnd->UpdateWindow();
Add the line...
m_pMainWnd->SetWindowTextA("Sketcher - John Doe");
Substitute your name for John Doe.
struct POINT          class CPoint               class CRect
{                     {                          {
   LONG x;               // Other stuff             // Other stuff
   LONG y;               LONG x;                    LONG left;
};                       LONG y;                    LONG top;
                       };                           LONG right;
                                                    LONG bottom;
class CPen            class CBrush               };
Do not define these in your code. They have already been defined in the Device Context.CPoint MoveTo(int x, int y); CPoint MoveTo(POINT pt); CPoint MoveTo(CPoint pt);Do not prototype these functions in your code. They have already been defined in the Device Context.
pDC->MoveTo(50, 50);

POINT pt1;
pt1.x = 50;
pt1.y = 50;
pDC->MoveTo(pt1);

CPoint pt2;
pt2.x = 50;
pt2.y = 50;
pDC->MoveTo(pt2);
Drawing Lines
BOOL LineTo(int x, int y);
BOOL LineTo (POINT pt);
BOOL LineTo (CPoint pt);
Do not prototype these functions in your code. They have already been defined in the Device Context.
pDC->LineTo(100, 100);

POINT pt1;
pt1.x = 100;
pt1.y = 100;
pDC->LineTo(pt1);

CPoint pt2;
pt2.x = 100;
pt2.y = 100;
pDC->LineTo(pt2);
Drawing Rectangles
BOOL Rectangle(int x1, int y1, int x2, int y2);
BOOL Rectangle(LPCRECT rect);
Do not prototype these functions in your code. They have already been defined in the Device Context.
pDC->Rectangle(100, 100, 200, 200);

LPCRECT rect = new CRect(100, 100, 200, 200);
pDC->Rectangle(rect);
Drawing Ellipses
BOOL Ellipse(int x1, int y1, int x2, int y2);
BOOL Ellipse(LPCRECT rect);
Do not prototype these functions in your code. They have already been defined in the Device Context.
pDC->Ellipse(100, 100, 200, 200); // Draw a circle

LPCRECT rect = new CRect(100, 100, 300, 200);
pDC->Ellipse(rect);  // Draws an ellipse
Drawing Arcs
BOOL Arc(int x1, int y1, int x2, int y2, int x3, int y3, int x4, int y4);
BOOL Arc (LPCRECT rect, POINT StartPt, POINT EndPt);
BOOL Arc (LPCRECT rect, CPoint StartPt, CPoint EndPt);
Do not prototype these functions in your code. They have already been defined in the Device Context.
pDC->Arc(50, 50, 150, 150, 125, 50, 100, 150);

LPCRECT rect = new CRect(50, 50, 150, 150);
POINT pt1;
pt1.x = 125;
pt1.y = 50;
POINT pt2;
pt2.x = 100;
pt2.y = 150;
pDC->Arc(rect, pt1, pt2);

LPCRECT rect2 = new CRect(250, 250, 350, 350);
CPoint pt3;
pt3.x = 225;
pt3.y = 150;
CPoint pt4;
pt4.x = 200;
pt4.y = 250;
pDC->Arc(rect, pt3, pt4);
CPen(int penStyle, int width, COLORREF COLOR);	// CPen default constructor
BOOL CreatePen(int penStyle, int width, COLORREF color); // Initializes a CPen object
Do not prototype these functions in your code. They have already been defined in the Device Context.
CPen aPen;		// Create a pen
aPen.CreatePen(PS_SOLID, 2, RGB(255,0,0));	// Init the pen to draw lines solid, 2 pixels wide, and red

CPen aPen(PS_SOLID, 2, RGB(255,0,0)); // Create and init a pen
Pen Styles
CBrush(int brushStyle, COLORREF color);
BOOL CreateBrush(int brushStyle, COLORREF color);
Do not prototype these functions in your code. They have already been defined in the Device Context.
// Create a solid red brush
CBrush aBrush(RGB(255, 0, 0));

// Create a solid red brush
CBrush aBrush;
aBrush.CreateSolidBrush(RGB(255, 0, 0));

// Create a horizontal hatch red brush
CBrush aBrush(HS_HORIZONTAL, RGB(255, 0, 0));

// Create a horizontal hatch red brush
CBrush aBrush;
aBrush.CreateHatchBrush(HS_HORIZONTAL, RGB(255, 0, 0));	// Init the brush

// Create a brush using a bitmap
CBrush aBrush;
CBrush bmpBrush;
HBITMAP hBmp = (HBITMAP)LoadImage(NULL,"DukeBrush.bmp",IMAGE_BITMAP,0,0,
		LR_LOADFROMFILE|LR_DEFAULTSIZE);
if(hBmp != NULL)
{
    CBitmap Bmp;
    Bmp.Attach(hBmp);
    bmpBrush.CreatePatternBrush(&Bmp);
}
else
{
    aBrush.CreateSolidBrush(RGB(0, 0, 255));
}
Bitmap brushes will tile the bitmap inside the object being filled.
     pDC->SelectObject(&aPen);		// Assumes aPen is a CPen object not a pointer
     pDC->SelectObject(&aBrush);	// Assumes aBrush is a CBrush object not a pointer
Saving and restoring pens and brushes
     CPen *oldPen = pDC->SelectObject(aPen);
     // Use the pen
     pDC->SelectObject(oldPen);     // Restore original pen

     CBrush *oldBrush = pDC->SelectObject(aBrush);
     // Use the brush
     pDC->SelectObject(oldBrush);     // Restore original brush
void CDemo05SketcherView::OnDraw(CDC* pDC)
{
	CDemo05SketcherDoc* pDoc = GetDocument();
	ASSERT_VALID(pDoc);
	if (!pDoc)
		return;

	// TODO: add draw code for native data here

	// Demonstration drawing lines with default pen
	pDC->MoveTo(10, 10);
	POINT pt1;
	pt1.x = 50;
	pt1.y = 100;
	pDC->LineTo(pt1);
	CPoint pt2;
	pt2.x = 100;
	pt2.y = 50;
	pDC->LineTo(pt2);

	// Define some pens and draw lines.  Note: we save and
	//  restore the default pen.  You should also delete any
	//  pen you create, BUT NOT WHILE IT IS SELECTED IN THE DC.
	// Pen Styles: PS_SOLID, PS_DASH, PS_DOT, PS_DASHDOT,
	// PS_DASHDOTDOT, PS_NULL, PS_INSIDEFRAME
	CPen redPen(PS_SOLID, 1, RGB(255, 0, 0)); // Create solid red pen in one setp
	CPen* pOldPen = pDC->SelectObject(&redPen); // Set the pen to draw with
	pDC->MoveTo(10, 10);
	pDC->LineTo(50, 50);
	pDC->LineTo(100, 10);
	// Create dash green pen, 2 pixels wide, in 2 steps
	CPen greenPen;
	greenPen.CreatePen(PS_DASH, 2, RGB(0, 255, 0));
	pDC->SelectObject(&greenPen);
	pDC->LineTo(250, 50);
	pDC->LineTo(400, 10);
	// Create a dotted, 5 pixels wide blue pen
	CPen bluePen(PS_DOT, 5, RGB(0, 0, 255));
	pDC->SelectObject(&bluePen);
	pDC->LineTo(400, 100);
	pDC->LineTo(450, 10);
	// Restore default pen
	pDC->SelectObject(pOldPen);
	// Delete the pens used. DO NOT DO THIS WHILE A PEN IS STILL
	//  SELECTED IN THE DC
	redPen.DeleteObject();
	greenPen.DeleteObject();
	bluePen.DeleteObject();

	// Create a brush for filling shapes
	// Styles: HS_HORIZONTAL, HS_VERTICAL, HS_BDIAGONAL, HS_FDIAGONAL,
	// HS_CROSS, HS_DIAGCROSS
	// To create an empty brush use...
	// CBrush nBrush; // = pDC->CreateStockObject(NULL_BRUSH);
	// nBrush.CreateStockObject(NULL_BRUSH);
	// pDC->SelectObject(nBrush);

	// Create a solid red brush and fill 2 rectangles with it.
	// The outline is drawn with the currently set pen.
	// Note: We save the default brush for later resetting
	CBrush redBrush(RGB(255, 0, 0));
	CBrush *pOldBrush = pDC->SelectObject(&redBrush);
	LPCRECT rect = new CRect(10, 100, 35, 125);
	// Note: LPCRECT is a pointer and the rectangle args define
	// left, top, right, bottom coordinates.
	pDC->Rectangle(rect);
	// Create a blue brush with Diagonal Cross Hatching
	CBrush blueBrush(HS_DIAGCROSS, RGB(0, 0, 255));
	pDC->SelectObject(&blueBrush);
	pDC->Rectangle(10, 150, 60, 200);
	delete rect; // Get rid of the rectangle object

	// Reset to redBrush
	pDC->SelectObject(&redBrush);
	blueBrush.DeleteObject();  // Get rid of the blue brush

	// Draw a couple of ellipses (ovals). Note if width and
	//  height are equal the ellipse will be a circle
	pDC->Ellipse(50, 100, 100, 150);
	LPCRECT rect2 = new CRect(150, 150, 350, 200);
	pDC->Ellipse(rect2);
	delete rect2;

	// Draw a couple of arcs, one filled with the red brush
	//  another filled with the default brush and lines drawn
	//  from the center to the defining points
	//BOOL Arc (LPCRECT rect, POINT StartPt, POINT EndPt);
	//BOOL Arc (LPCRECT rect, CPoint StartPt, CPoint EndPt);
	//BOOL Arc (int left, int top, int right, int bottom,
	//           int startX, int startY, int endX, int endY);
	LPCRECT rect3 = new CRect(250, 250, 350, 350);
	CPoint pt3, pt4;
	pt3.x = 350;
	pt3.y = 300;
	pt4.x = 350;
	pt4.y = 350;
	pDC->Arc(rect3, pt3, pt4);
	pDC->Arc(400, 400, 450, 500, 425, 375, 475, 600);
	// Note these lines show where the actual start and end points
	//  are by drawing lines from the center of the arc to the points.
	// Drawing is done in a counter-clockwise direction
	pDC->MoveTo(425, 450);
	pDC->LineTo(425, 375);
	pDC->MoveTo(425, 450);
	pDC->LineTo(475, 600);
	delete rect3;

	// Create a bitmap brush
	CBrush bmpBrush;

	// Put a .bmp file in the same directory as the source for this
	//   file and change the name in the line below.
	HBITMAP hBmp = (HBITMAP)LoadImage(NULL,"DukeBrush.bmp",IMAGE_BITMAP,0,0,
		LR_LOADFROMFILE|LR_DEFAULTSIZE);
	if(hBmp != NULL)
	{
		CBitmap Bmp;
		Bmp.Attach(hBmp);
		bmpBrush.CreatePatternBrush(&Bmp);
		pDC->SelectObject(bmpBrush);
	}
	// If creation of bitmap brush failed we will just use
	//  the previously set brush.

	// Draw a rectangle and an oval with the bitmap brush
	pDC->Rectangle(500, 400, 600, 500);
	pDC->Ellipse(600, 400, 700, 500);

	// Clean up
	pDC->SelectObject(pOldBrush); // Restore default brush, already did pen
	redBrush.DeleteObject();
	bmpBrush.DeleteObject();
}
